Saturday, April 27, 2013

Fitness Tip of the Day: Something New Saturday -- Stability Ball Workout


Today I'm introducing my favorite piece of workout equipment--the stability ball.  I became very familiar with this piece of equipment several years ago while I was going through physical therapy for a herniated disc in my lower back.  I realized that the routine I was doing was actually Pilates on the ball, which is a class that I now teach once a week.

The ball is great; just sitting on it forces you to engage your core and sit up taller, or you'd fall off of it.  I remember my very first experience using the ball was at a continuing education conference.  It was not a class for beginners. Needless to say, I spent more time falling off the ball than doing the exercises that were being shown!  Thankfully, most of us were just learning, so I wasn't the only one.  Even though I was having some trouble, I knew I was hooked.  I could instantly feel my muscles engaging to help keep me in position.  Try just sitting on it while watching TV.  You will feel it.  The only drawback that I can think of for this piece of equipment is storage.

Some of the exercises can be intimidating at first, but can be mastered with practice.  Doing exercises that utilize the ball will help to improve your balance, strengthen your core, improve your posture--all things that become more and more challenging as we get older.  The video that I chose is for a beginner and is pretty basic.  I'll post more advanced videos in the future.

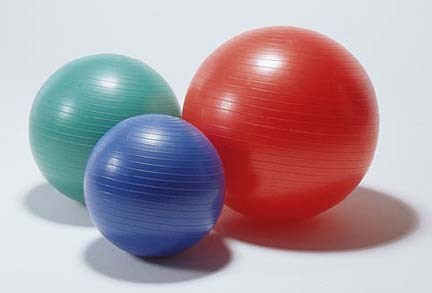
There are a few important things to know about the stability ball before you start using it.  First, and most important, make sure you are using the right size ball.  They come in 45, 55 and 65 centimeters.  Usually they are listed by height.  If you are 5"0" or under, you'd use a 45 cm ball, 5'1" to about 5'6" , 55 cm and over 5'7" 65 cm.  The problem with this is if you have longer or shorter legs, you may have to adjust.  The ideal way to check for size is to sit on an inflated ball.  Your knees should be bent at 90 degrees.  If they are above 90 degrees, try the next size smaller, if they are bent under 90, try the next size bigger.

The second thing is to make sure the ball is fully inflated.  The more inflated the ball is, the more challenging the exercises will be.  The ball shouldn't feel mushy or heavily indent under your bottom.  You'll have to add air from time to time.

Thirdly, for exercises performed while on your side--especially those requiring more balance--keep your shoulders in line with your hips.  If you drop your shoulder forward, that's the way you will fall, if you drop it back, that's the way you will fall.

Finally, make sure the surface that your feet are on isn't slippery.  You need to have some traction.  A yoga mat is ideal for this if you have one.

They are not expensive.  I have seen stability balls for $10 or less at many stores--T J Maxx, Marshall's, Ross, Burlington Coat Factory--even Menard's and Aldi (usually seasonal).  They usually come with their own hand or foot pump, so pick one up and have a ball!  


Friday, April 26, 2013

Fitness Tip of the Day: Friday's Facts and Findings


This article (geared mainly to women, but much applies to men) from Shape Magazine was on my facebook news feed this past Tuesday and I thought it was worth sharing.  It kind of goes along with the stop the crazy cardio video that I posted 2 weeks ago.

Here, briefly, are the 8 reasons (please read the whole article for the most info):

1.  You'll Burn More Fat.  Muscle is active tissue--the more you have on your body, the more calories you will burn.  Doing just cardio may cause you to lose muscle as well as fat.

2.  You'll Look More Defined.  Ladies-- you will NOT bulk up!  Women do not have enough testosterone in their bodies to build that kind of muscle.  Women bodybuilders spend hours in the weight room and most are taking some kind of testosterone based hormone or steroid.  Again, if you only do cardio and start burning muscle along with fat, instead of a nicely defined body, the skin will start hanging off of your limbs--not very attractive!

3.  You'll Fight Osteoporosis.  This is more prevalent in women, but men can get this too.  One way to prevent it is to do muscle bearing exercises.

4.  You'll Burn More Calories.  Yes, doing a cardio routine will burn more calories while you are doing it; adding weight training provides an afterburn which can last long after your workout.

5.  You'll Build Strength Faster.  As I said in yesterday's post, to build strength (again not bulk), lift heavier weight with less reps.  To build endurance, lift lighter weights with more reps.

6.  You'll Lose Belly Fat.  A study done showed women who did weight training along with cardio lost more deep belly fat that those women who did cardio alone.

7.  You'll Feel Empowered.  Feeling and looking strong, makes you more confident.

8.  You'll Prevent Injury.  Strength training helps protect your joints that can get a lot of strain during cardio workouts--especially those that are higher impact.

Now I'm not saying that you should go out and get a barbell with 100 lb plates!  The way to determine if a weight is heavy enough for strength training is to do some actual exercises with it.  For strength training, you should only be able to perform 5-8 reps with good form.  If you can do more, the weight is too light.  Keep in mind that some muscles are bigger or naturally stronger than others--like your biceps vs your triceps, therefore, you'll need weights of different poundage for different muscles/exercises.

In some cases, bodyweight training is the better choice (like push ups, squats, lunges and ab work).  As I've said before, your bodyweight is heavier than even a 100 lb. plate.  It's when you are isolating muscles that hand weights become more important.

Thursday, April 25, 2013

Fitness Tip of the Day: Thursday Total Body - Day2/Phase 1 BeFit in 90

As promised, here is another series of four videos that make up Day 2--Phase 1 of the BeFit in 90 program.

The first video is your 5 minute warm up.


The second video is a 10 minute strength routine focusing on back and shoulders.  They use dumb bells in this workout--now might be the time to invest in a pair or two.  If you're a beginner (woman), I'd say get a set of 3 lbs and 5 lbs.  If you're a man or have been exercising regularly-- start with a set of 5-8 lbs and 10 lbs. Do a few reps of different types of exercises in the store, you'll be able to tell which is right for you.  If strength is your goal--more weight less repetitions, if endurance is your goal, less weight, more repetitions.  I suggest doing a bit of both--that's why I suggest 2 different weights.


The third video is cardio --10 minutes of level 1 MMA (Mixed Martial Arts)

Couple of safety issues--make sure that you don't snap out at your elbow as you punch, especially during jabs.  You want to completely extend your arm, but make the power of the punch come from your shoulder and upper back, rather than from the elbow joint.  Make sure you do the pivoting with your feet as you punch as well.  Keeping your feet still could hurt your knees.


and the fourth video cools you down and stretches you out using yoga basics.  If you've never done Vinyasa (flowing) yoga before, I would suggest watching this through first.  If this isn't your thing, you can go back to Day 1 from Tuesday's post and do that stretch routine, or one of the two on the sidebar.


Wednesday, April 24, 2013

Fitness Tip of the Day: Wednesday's Website -- SparkPeople


Today I'm featuring another free website that is very similar to MyFitnessPal and is designed to help people create diet and exercise plans with recipes and articles and videos related to health, fitness, nutrition, as well as beauty and style.

There is a community page that has challenges, success stories and forums on different topics as well as members blogs.

There are Spark "Teams" that you can join to connect with other people who have similar goals and interests.  There is even a radio show that you can listen to.

Like other similar websites, there are free food and fitness trackers as well as mobile apps.

Check it out at:   SparkPeople.com

Tuesday, April 23, 2013

Fitness Tip of the Day: Tuesday Trunk and Core -- Winsor Pilates


Single Leg Stretch
Today I am featuring another Pilates video.  As an instructor, I can again tell you that Pilates is one of the best and gentlest ways to sculpt and strengthen your core and entire body.  This video shows level 1 basic/classic Pilates exercises along with modifications.

Once again, if you do this regularly--3 times a week (every other day), you will see and feel changes not only in the shape of your body, but in your posture and flexibility as well.  I chose to feature another level 1 video because it's important to master these moves and do them with perfect form before you move on to level 2 exercises.

You could continue at this level indefinitely and still see results as long as you have your "powerhouse"--the muscles of your abs, lower back and legs--engaged the entire time.  Level 2 does engage and strengthen your upper body more, but as long as you are working those muscles in other ways, you are fine.


Monday, April 22, 2013

Fitness Tip of the Day: Monday Muscle Work - BeFit in 90 Day 1


Today I'm posting four, yes four videos that make up Day 1--Phase 1 of the free BeFit in 90 days series on YouTube--it's only about 35 minutes total.  I added a direct link to the youtube channel on the right side bar.

The first video is your 5 minute warm up and dynamic stretch:


Video 2 is 10 minutes long and will work your Chest, Legs and Buns -- they do use hand weights here.  If you don't have any, you can do the exercises without--or use water bottles.


Video 3 is a 10 minute Fat Burning Cardio workout, no equipment needed


and video 4 is a 10 minute Sports Stretch and Flexibility Workout


Each Phase of workouts progresses to more challenging exercises and routines.  I'm going to post Day 2--Phase 1 on Thursday.  Remember take breaks and modify when you need to.

Sunday, April 21, 2013

Fitness Tip of the Day: Sunday Recipe Share -- Healthier Mac and Cheese

Going along with my post on Friday regarding childhood obesity, I decided to post a healthier version of a childhood and adulthood favorite:  macaroni and cheese.


None of my four kids really loved it all that much.  I admit, I made it mostly from the box (remember, I didn't really get into health and fitness until my third child was born around 1992).  It was during this time that the lowfat/no fat craze was going on.  So, to me, if I made the stuff from the box with skim milk and no butter, making it pretty much fat free, we were eating "lighter" which must mean healthier food.  I didn't give much thought to the weird orange color, it was all about fat grams, plus did I mention I had four kids....Anyway, I usually prepared it as a side dish (yes, 1 box for the 6 of us) and there would still be leftovers!

No my kids were not huge fans, that is until I discovered how easy it was to make my own cheese sauce and started to bake it, now they request it.  Little do they know that my mac and cheese is healthier than that stuff in the box, even though it tastes so yummy!

Here's my recipe:

Preheat oven to 350.  Cook whatever shape pasta noodles you want to use--I prefer something more ribbed or even small shells to hold more of the sauce, and I use whole wheat pasta or a combo of regular and whole wheat.  For this recipe, for an 8 x 8  inch casserole, I'd make 1/2 of a 16 oz. box of pasta.  You can easily add some frozen veggies--chopped broccoli, cauliflower, green beans to the pasta the last minute or so to cook.  Adding salt to the pasta water is optional--sometimes I do, sometimes I don't, it depends on the cheese I use in my sauce.  Drain, but keep a bit (1/2 c or so) of the pasta water.

I make my sauce several different ways.  I start out making a basic white sauce--here's where one of the differences are.  If I'm serving this as a side with something like burgers or other red meat, I omit any oil or butter from the recipe.

White sauce #1.  I start with a can of evaporated skim milk and put that into a saucepan.  To this, whisk in about 3 tablespoons of flour ( I use whole wheat).  Put this on medium heat stirring constantly until it starts to thicken.  If it is too thick, you can add some of the pasta water or milk--whatever you have in the fridge, by the tablespoon until it becomes the desired consistency.  If it's a little thin, wait, additional cooking and/or the added cheese may thicken it up enough.

White sauce #2.  I prepare a roux first.  Heat up 3 Tablespoons of olive oil in the saucepan.  Whisk in 3 Tbls of flour cook for a minute or so--if too thick add a bit more oil.  To this add the can of evaporated skim milk, cook on medium heat whisking constantly until thickened.

Turn the sauce down to low.  To the white sauce add:  2 oz (1/4 pkg) of light cream cheese that is cut into chunks.  Stir until melted.  Remove sauce from heat.  To this add your choice of 1/2 c. shredded cheese.  I usually use reduced fat cheese.  Here's where you can get creative--there are so many flavors of cheese.  Stir until melted.  If the sauce is thin, add a tablespoon or 2 more of cheese. Add salt/pepper to taste.  Some cheeses contain a lot of salt.  Make sure you taste first.  Note:  I use this same recipe for my Alfredo sauce, I use mozzarella, plus Parmesan, Asiago, Romano or a blend.

Depending on the size of your pot, you can either add the pasta to the sauce, or the sauce to the pasta.  If it's too thick, thin it down with some of the pasta water.

Spray an 8 x 8 casserole dish with cooking spray.  Spoon the pasta into it.  Instead of buttered bread crumbs, I crush up corn flakes (about 1/3-1/2 cup) and sprinkle them on top and then drizzle a bit of olive oil over it.

Bake 20-30 min until bubbly.  Enjoy!

I found this recipe on Pinterest from a pin via myplate.  I would make the pasta and sauce my usual way, but I like the idea of adding mashed butternut squash to it--especially to a cheddar sauce--canned pumpkin would probably be good too--maybe 1/2 a can and then more to taste.  

http://www.diabeticlivingonline.com/recipe/four-cheese-macaroni-and-cheese/

Do you add/sneak veggies into any of your recipes?  I add all kinds of  shredded or blended veggies to meatloaf, burgers and meatballs.  When I have cauliflower, I always make my mashed "potatoes" half cauliflower, I add pumpkin to my chili, zucchini to baked goods. I like adding veggies to  recipes to add flavor and to amp up the nutritional value.   I only have one child that isn't a big vegetable eater.  Thankfully, he loves salad so there's always that option, along with my sneakiness :)